View and Run a Report
This topic covers how to view and run an existing Report
| The Report Viewer | Search Report Results |
| Export Report | The Entity Profile Report |
| LiNK Report |
Access Reports
To access Reports select Reports from the Workspace menu. This opens the Reports listing. Reports that the User has permissions to access are listed. Click on the Report Title to open it then select Report Viewer.
Once a Report design has been successfully completed and saved, the Report can be run and results viewed in the Report Viewer.
Permissions apply; Only Reports that a user has been added to will be visible in the Reports list.
Select View (from the main menu) then Reports. Click on a Report Title to open it, then from the left menu select Report Viewer.
Parameters
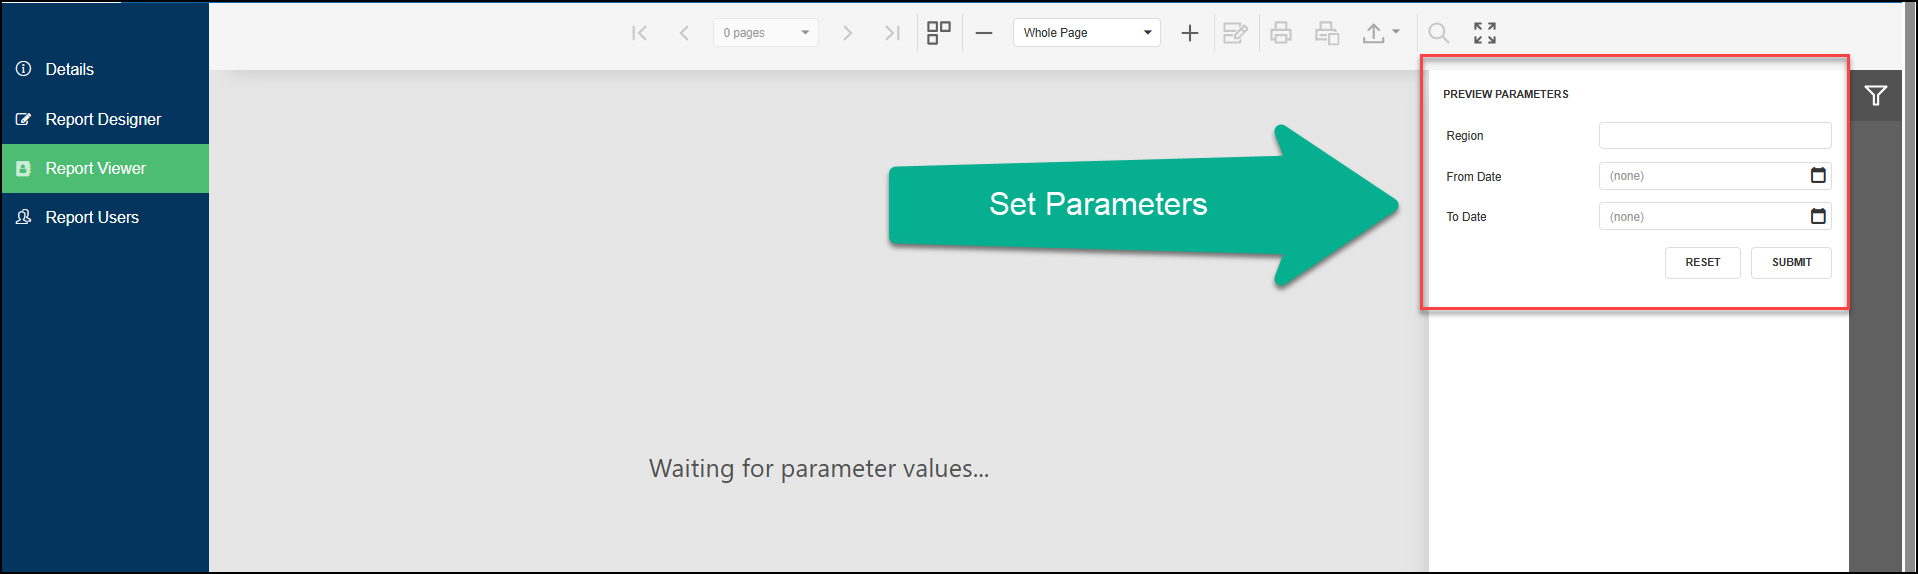
Where parameters have been added, the viewer will show the message - Waiting for parameter values.
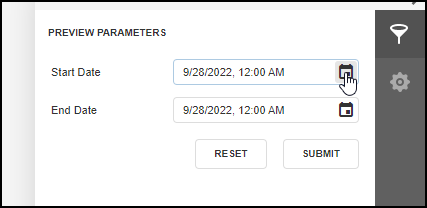
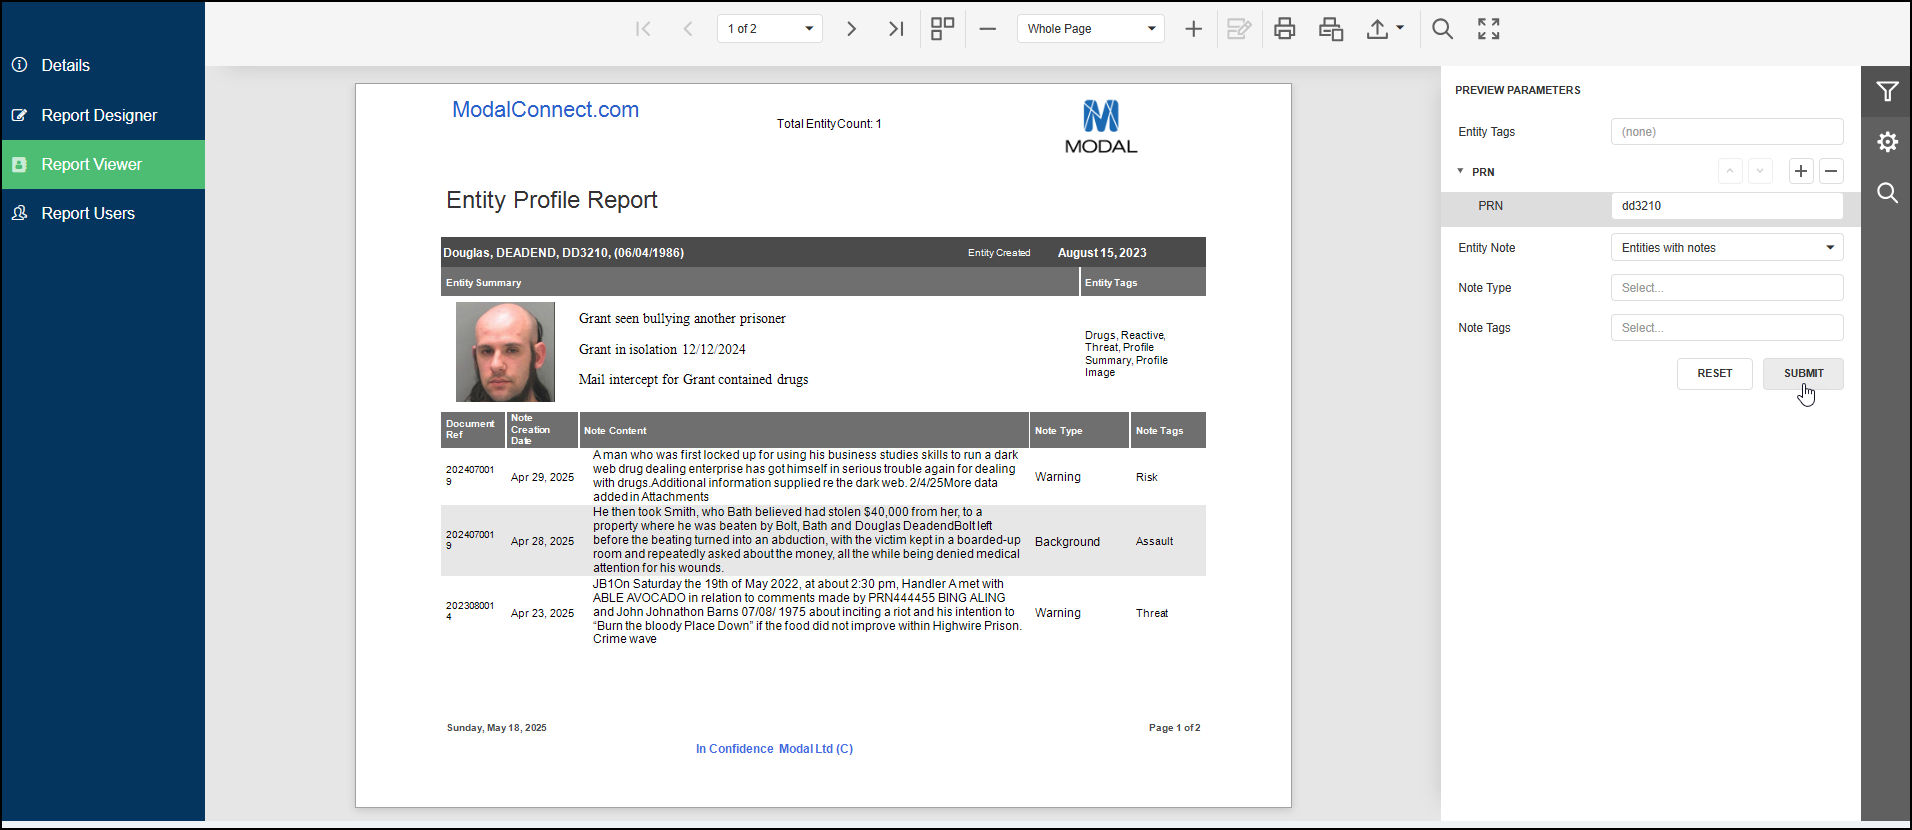
The Parameters are shown on the right and are used to filter the Report data. Enter in, or select from drop-down lists the specific data (these will differ on each Report) for the parameter -e.g Date range, a File, Document Type, Entity name, PRN or ID and click Submit.
For date parameters - specify the Start (from) and End (to) dates before clicking submit. Either select the date or enter in as mm/dd/yyyy .
A date with a preset value (which will age over time) can be updated within the Report Designer - see View and Run a Report
Once the Parameters have been set, select Submit to load and display the Report.
Selecting Reset will reset any filters applied.
The Report Viewer top tool bar runs across the top of the viewer.

Use this to navigate through or to a specific page, load all pages, zoom and viewing options - either click through pages using the next or previous arrows < > or select the multipage view to scroll, print current page or all, select the File Type to export the Report, open the Search or to view the Report at full screen.
Search Report Results
The Report search function can be accessed via the Search button in the top tool bar or on the right.
Enter the search word or term and click Search or 'Enter' from your keyboard. Or select Match Case or Match Whole Word. Use the 'find next' arrows on the right or click on a search result to view and locate the result in the Report.
Note; include any spaces or special characters when searching for more than 1 term. E.G if the Entity type label includes (as seen in the Report) brackets or commas before or after the text - (21), 456456 or John, Smith, 01/02/1982


Export Report
To export a Report - from the top menu select the required File Type. The File Type settings are available by clicking on the Settings icon to open the Export Options pane.
For a spreadsheet format the CSV export is easiest for reformatting and sorting of data.

A new Report is now available to report on key details from the Entity Profile for the Person Entity Type.
The Entity Profile Report includes the following details;
- Entity Title
- Entity Created Date
- Entity Profile picture
- Entity Summary content
- Entity Profile Tags
- Entity Notes - includes Document Number, Note created date, Note Content, Note Type and Note Tags.
The Report can be run using the following filters (parameters);
Mandatory parameter - at least one parameter value must be selected from - Entity Tags, PRN (add enter value), Entity Note Type/s, Entity Note Tag/s. The submit button is not enabled until a parameter value has been selected or added.
- Entity Profile Tag/s - single or multi-select (the AND condition is applied to multi-select).
- Entity Property - PRN, ID expand- click + then enter a PRN
- Entity Note - 2 options - 1: Entities with Notes (default setting) OR 2: Entities with or without notes (if using option 2 , must also filter by Entity Tag and or PRN)
- Entity Note Type - single or multi-select (the AND condition is applied to multi-select).
- Entity Note Type Tag/s - (default is all/any note tags) single or multi-select (the AND condition is applied to multi-select).
Multi select of Entity Tags, Note Types and Note Tags; where more than 1 Entity Tag and/or Note Type or Note Tag is selected the AND condition is applied so results will only include Entities have all the values selected.
Exception where 'Entities with or without notes' is selected against Entity Note, Entity Tag/s and or PRNs must be selected or specified.
Running the Report
From the Reports list click on the Report Title of 'Entity Profile Report' then from the Report's left menu select 'Report Viewer'.
In the Report Viewer use the filters on the right to specify and set the Parameter values (must select (or enter a value) for at least 1 parameter. This enables results to be returned to match the criteria set in the Parameters.

- Entity Tag/s - select which Entity Profile Tag/s to return results for, or, if left blank results are not filtered by Tags.
Where more than one Tag is selected, results include Entities that have the Tags selected E.G Select Tags - 'Reactive' AND 'Threat' Results will only include Entities with both Tags of Reactive AND Threat. Note - all assigned Tags of the Entity/s are shown on the Report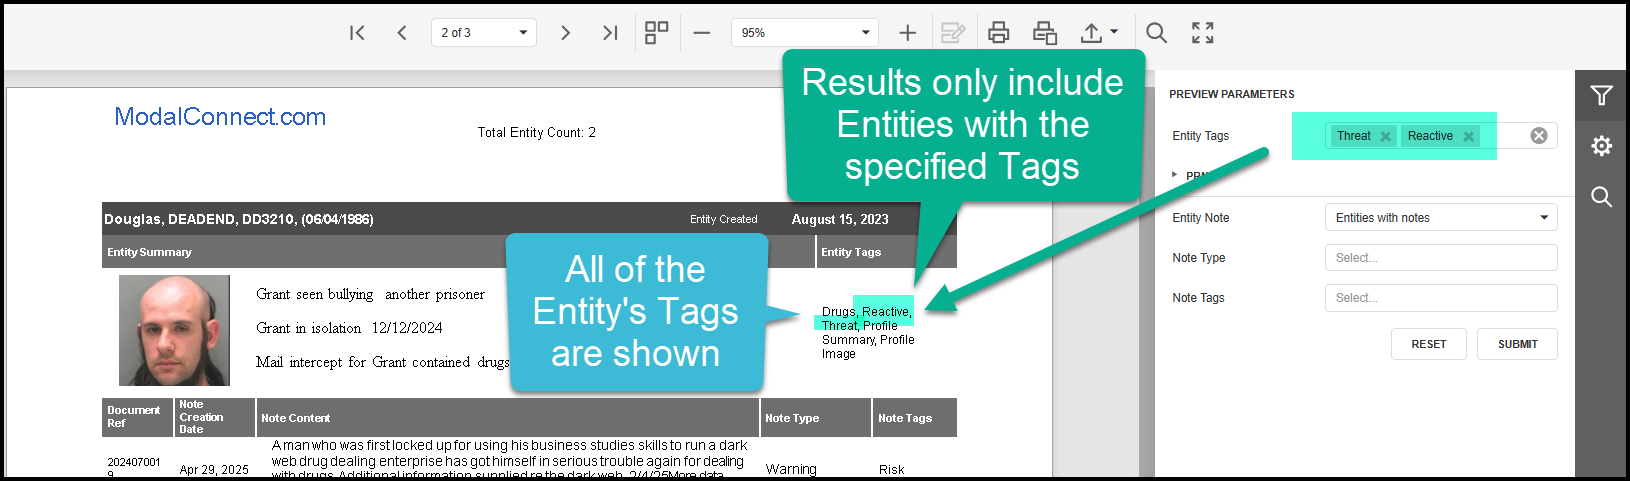
- Property - enter the value of the Property for the Entity to report on - e.g a PRN or other Entity ID. Expand the Parameter then click + to add a value field then enter the PRN value. Add a new field for each PRN to Report on. Note; while a partial value may be entered this will likely increase the number of results.

- Entity Note; - 1: Entities with Notes (default setting) must also select at least 1 other Parameter. Results only include Entities with Notes. OR 2: Entities with or without notes -for option 2, must also filter by Entity Tag/s and or PRN/s - results include Entities with or without Notes with the Tag/s and or PRN/s specified.
- Entity Note Type - select the Note Type/s to return results for. Leave blank if no filtering is required and all/any available Notes assigned to the Entity/s will be returned (must also select at least 1 other parameter if left blank).
- Entity Note Tag/s - select which Note Tag/s to filter results by. Leave blank if Note tag filtering is not required for the selected Note Type.
- Click Submit to run the Report and view results.
- Results are sorted alphabetically by Person Entity Surname.
- The Report can be exported to PDF from the Report top menu.


Notes;
- Results can be updated by Entity Tag/s and or Note Type and/or Note Tag/s either prior to clicking Submit or to existing results by clicking Submit again.
- Notes are sorted by descending order of the Note Creation Date
- A page break separates each Entity profile result.
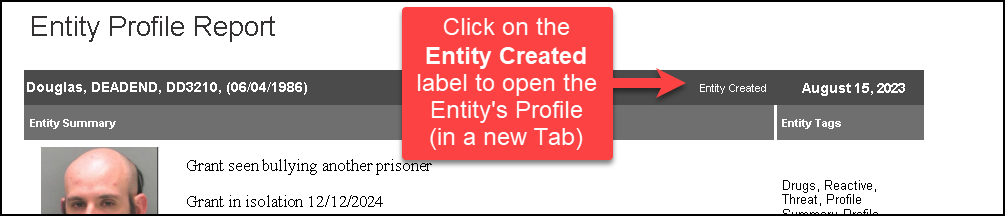
- To view an Entity Profile - click on 'Entity Created' which will open that Entity's Profile in a new Tab.
- The total number of Entities returned in the results appears at the top of each page.
- Click Reset to clear the previous parameter values selected or added prior to selecting a different set of parameters for another Report.
- Results can be viewed per page by clicking the next arrow - or select the multi-page view to scroll down results
The LiNK Report provides reporting for the number of LiNK submissions that have been processed within a date range. Contact us to add this Report for your Organisation.
A prerequisite is that the Document Type is set as LiNK Form.
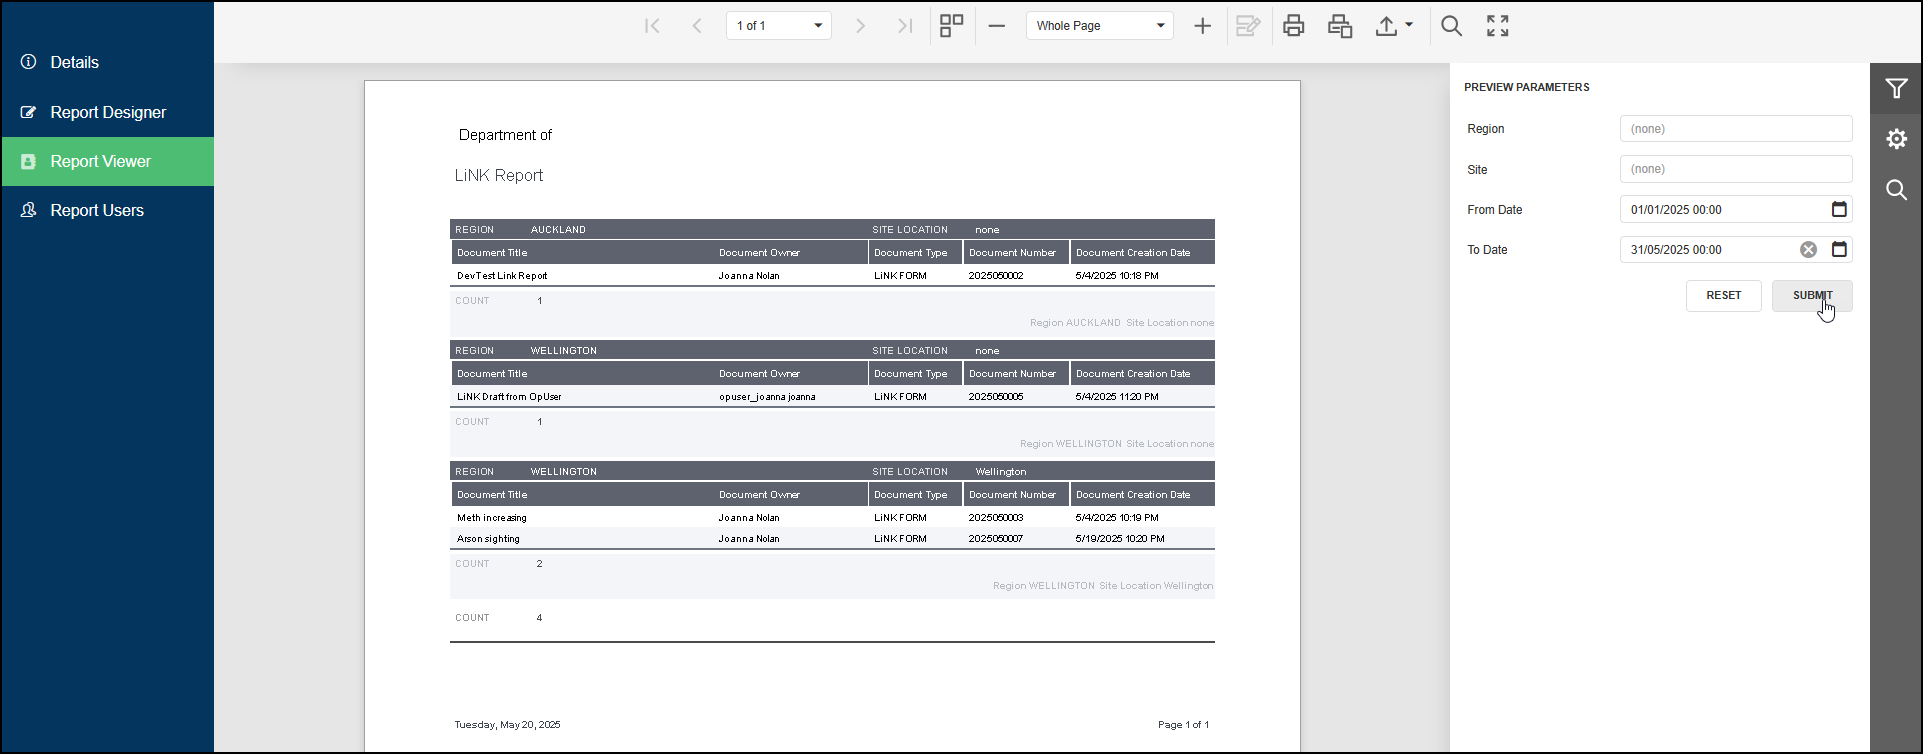
The LiNK Report contains the following data;
- Region - source; Document properties
- Site Location - source; submitters AD Site (if not assigned shows as 'none')
- Document Title - source; Document
- Document Owner - source; Document (alternative could be the 'Document Created By' which shows the user's email - contact us to change)
- Document Type - source; Document
- Document Number - source; Document
- Document Creation Date (this is the date the submitted form was processed as a Document)
A count is provided by Region and Site (combined), with the total number of LiNK documents count on the last page.
Parameters
The following Parameters are available in the LiNK Report
- Region - the default includes all Regions in results - to run the Report for a single Region enter the Region name.
- Site - the default includes all Sites in results - to run the Report for a single Site enter the Site name.
- From Date - select the required from date
- To Date - select the required to date
Note; where no Region or Site has been recorded against a Document, the Region or Site value shows as 'none'.
Run the Report
Open the Report and select Report Viewer from the menu.
Set the Parameters:
- To include all Regions and Sites, leave the Region and Site parameters showing (none), specify the date range using the From and To dates. Click Submit to load the results.
- By single Region and any Site associated with that Region, enter the Region name, leave the Site at (none) specify the date range using the From and To dates. Click Submit to load the results.
- By single Region and single Site, enter the Region name and the Site name, specify the date range using the From and To dates. Click Submit to load the results.
- By single Site, leave the Region at (none) and enter the Site name, specify the date range using the From and To dates. Click Submit to load the results.
Report export options are as detailed here Export Report